Saturday, April 27, 2013

I'm Published!

Last Fall I got an email from a lady from the new magazine, Sew It...Today, asking if I'd like to be featured in their magazine with my Travel Toothbrush/Toothpaste Roll from my Etsy shop Perfect Darlings.  She had found my project on Etsy.  I was stunned!  I was unbelieving!  So I googled the magazine name and found it to be the real deal.  Such a fun thing.  A blessing! After several communications with such nice editors, I made the 2 colors of travel rolls they wanted, and mailed them.  Just this last week, the magazine featuring my item was released.

Such beautiful, colorful photography that they did.  And they even sent the two travel rolls back to me, along with a little stipend.  What a fun and positive experience this was.  :)  I would recommend the magazine, too.  Only $3.99 per issue and has cute, quick projects for every seamstress and ability out there.Sew It...Today!

Blessings,
Donna

Linked To:
Sweet Little Gals

Sunday, April 21, 2013

Vintage Book Page Buntings and Table Runners


In finishing the series on how to use Vintage Book Pages for decor, I'll focus on the little buntings I made and the table runners.  So inexpensive and so fun...I think these two elements were among my favorites at our son's wedding rehearsal dinner.


I made three different kinds.  The one made of squares was easy.  I folded the papers to the width I wanted, and cut squares on the fold from book pages, black card stock, and hymn pages.  Put a bit of glue on the insides of the folded rectange, and then glue them with the black crochet thread sandwiched in the middle.  I spaced them out about every 3 inches.  Then when dry, use a small heart punch on the center of the folded paper.  (PS...it worked out GREAT to store them hanging over the top of our guest room door while I worked to get all six done.)

The pennant style bunting was made in the same way, altho the shapes cut were diamonds.  If you prefold your paper, then cut a long triangle shape on the fold, they will be nicely matched and easy to open, add a bit of glue, then glue them with the thread sandwiched in the middle.

Lastly I punched 1.5 inch circles out of book pages, cardstock, and hymn pages.  These I sewed together down the middle with my sewing machine.  So quick and easy.  I spaced them about 1/2 inch apart.

Please note that these buntings can tangle easily if you are transporting them someplace.  Wrap them around a piece of cardbord or a file folder, and they will stay tangle-free and flat until you are ready to use them.  Great way to store them after the party too.

Here is a view of how I layered them down the center of the table, on top of the paper table runner and plastic table runner.  (This photo was taken as I 'practiced' at home to see how it might all look for the dinner.)

Some of these adorable little buntings are now being used in my home!  :)

The book page table runners were made from old Ideals books.  The pages were the perfect width.  I used a craft knife to remove them from the books, used a paper edger to scallop the long sides of the page, and then zigzag sewed the short edge of every 2 pages together.  Because of the minute space between the sewed papers, they fold nicely into the size of one page, for storage and for transporting.

For the dinner I laid them end to end down the center of the table.  Only having every 2 pages sewn together allowed me the flexibility to put as many as needed down the table, since the tables were different lengths.  And the sewing gave the table runner, as a whole, more stability as a runner, than if all the pages had just been laid end to end without the sewing.

I've so enjoyed sharing these ideas with you.  Let me know if you make one of them!


Happy Crafting!

Donna
Linked To:
Sweet Little Gals
Made By You Monday


Friday, April 12, 2013

Vintage Book Favor Toppers


For our son's recent wedding rehearsal dinner in Chicago, I had so much fun decorating with vintage books.  Our son collects books like a girl might collect shoes.  He loves to read and enjoys vintage things too.  So a vintage book theme was a nice mix of classy yet not too feminine or frilly.  In my previous two posts, I showed the overall decor and showed how to make a book centerpiece and book plant pokes to go in the potted herbs I had at the center of each table.  Today I'll show the favors I made for the dinner.


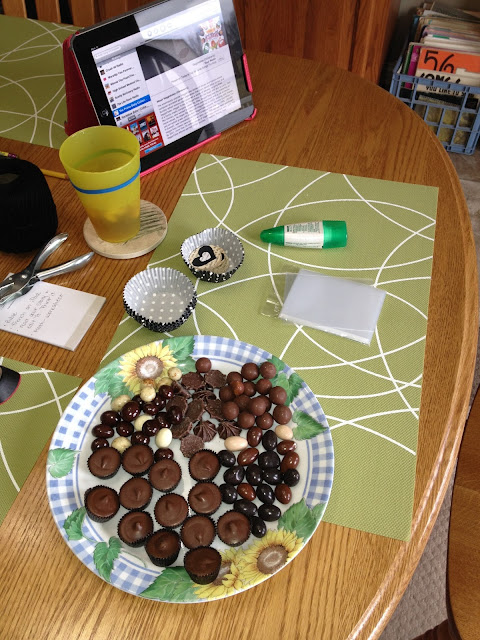
Since my decor colors were black, white, cream, and green, I wanted the favors to follow that color scheme.  I purchased different kinds of chocolate candies in dark chocolate, milk chocolate, and white/cream candy coating.  I bought malted milk balls, chocolate covered almonds, chocolate covered expresso beans, mini peanut butter cups, and chocolate stars.
Little cello treat bags and Wilton black and white polka dot cupcake liners formed the main part of the favor.


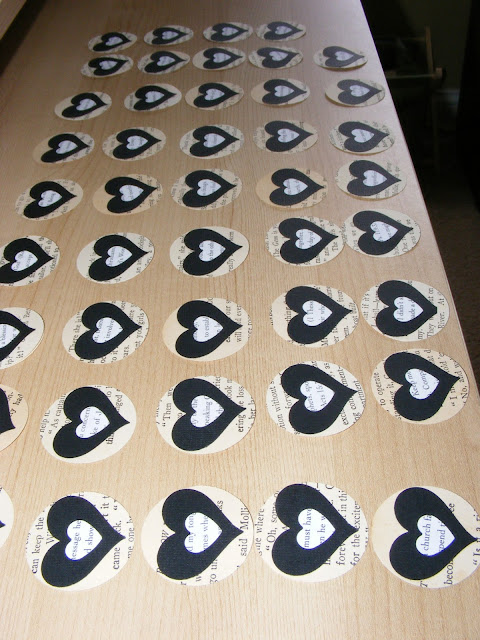
Next I spent several evenings punching out the parts to decorate the toppers.  1.5 inch circles were punched from creamish vintage book pages.  Black cardstock hearts were next.  And finally small hearts were punched from a more whitish toned vintage book page.  I glued those layers together...a circle, then the black  heart on top, and the small heart for the last touch.

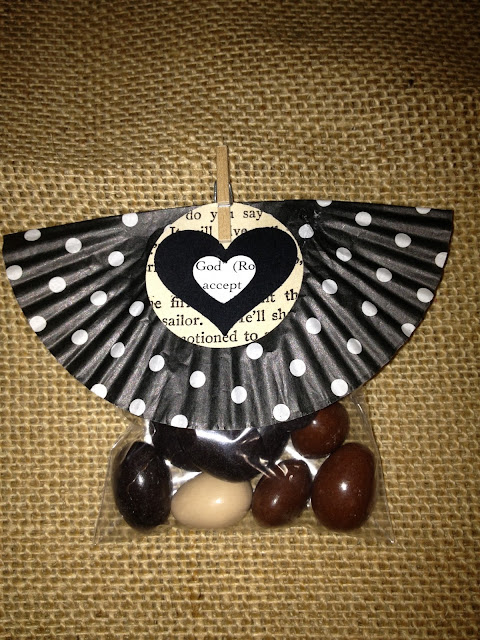
Next came the candy stuffing of the cello bags.  As I stuffed a bag, I took a cupcake liner I had prefolded in half with wrong sides together, and stapled it over the open top of the bag.
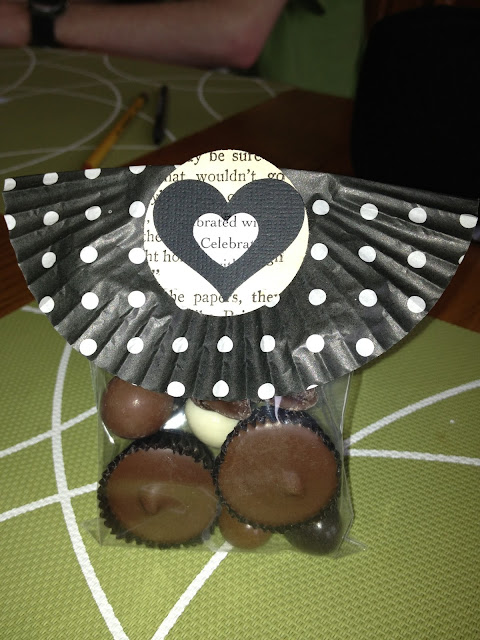
Lastly, the embellishments were glued to the front of the folded cupcake liner to cover the staple.  Done!

I made 50 of these little beauties.  And they were enjoyed by all the guests.
They were easy to transport 6 hours north to Chicago in a couple of Sterilite containers.

After seeing now nicely a cupcake liner can become a craft supply, I am starting to collect cute ones that I find for a good price.  Marshalls has some really cute ones, in fact.  Can't wait to see what other things I can make with cupcake liners.  :)

Thank you for stopping by!  Next time I'll show the Vintage Book Page Table Runners.  

Blessings,

Donna
Linked To:
Your Home Based Mom

Saturday, April 6, 2013

Vintage Book Page Plant Pokes

Welcome!  Today I want to show you how to make cute plant pokes out of things you already have at home.  You'll need some vintage book pages, black cardstock, pretty paper, wooden skewers, and glue!  Let's get started!

These plant pokes were to go into pots of herbs for our son's wedding rehearsal dinner.  The decor theme was centered around vintage books, and these little plant pokes were so fun to make and a very easy way to add alittle thoughtful detail to the table.

I went with green and white polka dot paper, a vintage book page, and black.  That combination gave me the drama and punch I wanted, but were simple and understated too.  I used paper punches to punch out the green flowers, black circles, and vintage page hearts.  I made the plant pokes double sided so it would like nice on both sides of the table.  I first laid out the pieces the way I found most pleasing, then glued them.  The contrasting black dot in the center of the circle tied it together.  Then I turned the design over so the wrong side was showing, and laid the pieces for the other side over it so they would match once glued to a stick.  I carefully glued these 2nd sides pieces together so they mirrored as seen above.  Lastly I used wooden skewers that people use for shish kebabs.  They were alittle too long, so I just cut off the top 2 inches of each one (leaving the pointed end untouched) and then glued them together.

Here is one of the tables from the rehearsal dinner.  The tables were concrete at the wonderful restaurant named JAM in Chicago where we had the dinner.  You can see that I used vintage books and book pages in many ways for the table decor.  Come back soon and I'll show you another project using book pages for this dinner.  :)

Table runners, buntings, and favors...all using old books I already had at home!

Wouldn't these make nice little gifts?  Party favors?  And decor for your home?  Decor for a Mother-Daughter luncheon?  You can use any color combo and come up with something just right for your next craft time!

Enjoy!

Blessings,

Donna
Linked to:


07 08 09 10
Pin It button on image hover