Thursday, January 17, 2013

A Home in Drayton Valley ~ A Book Review


Reading Christian fiction is my little daily vacation.  If a book is 'pretty good' then I read it just at bedtime til I get sleepy.  So some books take me more than a week to get through.  However this book not only got read at bedtime, but during the day in snippets here and there too!  It was really good!

I like stories that are a little bit different from the normal plots I have read time and again, and this one fits that bill.  Tarsie helps her sickly friend Mary, husband Joss, and their 2 wee ones to have the finances to move by wagon train from dirty, noisy downtown 1880 New York City to peaceful, rural Drayton Valley, KS.  The hope is that Mary's illnesses will lessen in a better environment.  However, Mary barely lives to see Kansas in the distance before her illness  consumes her.  Now Tarsie is left with the care of Mary's 2 little ones and the beligerent, prejudiced, ungodly Joss to finish the journey and set up a home.  What will happen?  Tarsie has promised Mary that she will love the children and even love Joss to the Lord.  But at what expense?

Kim Vogel Sawyer takes you on a wonderful journey with this unique story.  You will love it!

Blessings,
Donna

Monday, January 14, 2013

Felt Farm Animal Puppets

Our sweet little firstborn grandchild just turned one.  Happy 1st Birthday Carson Davis!!


His Momma dreamed up a darling birthday party for him.  The theme was Old MacDonald's Farm.  So farm animals played a large part in the decor.

Being that I love crafting, my daughter asked if I'd come up with some kind of table centerpieces for the tables where the guests would enjoy eating a farm fresh lunch!  "Of course!" I replied.

I found some cute farm animal ideas online and settled on these darling felt puppets.  I found these at Just Another Day in Paradise and was so glad that Larissa provided the patterns for free as well.  Cute for the party, and reusable throughout the years as fun toys!

I tweaked them a bit for my time schedule, just doing machine stitching around the outsides of the puppets, leaving raw edges, and sewing wrong sides together.  I used fabric glue to attach the faces and other details.  I did sew Kitty's whiskers on, using embroidery thread.

And here is how we displayed them on the tables...we sat each one over a small plastic cup turned upside down so that it would stand up, and then tucked some raffia around the base, as if it was in the barn.

Puppy got to welcome the gifts on the gift table.  :)  Carson will be able to play with these puppets when he is a bit older.  Since he loves animals so much, I'm sure they will star in many puppet shows over the years!  One little hint would be to make the body of the puppet a bit wider (another inch?) if you want adult hands to be able to wear the puppet.


Carson had such a fun birthday party!  Especially since our 2nd born grandchild, Eloise Mae, got to come too!  Eloise and Carson are just 7 weeks apart, and are sure to have GREAT fun over the years as cousins.  :)

And that's me.  Mimi!  I'm the happiest Mimi there ever was, when my arms are full of my granddarlings and my heart is full from having time with them.  There is nothing better!

Thank you for stopping in!  You'll find the puppet patterns HERE!

Blessings,
Donna
Linked To:
Tip Junkie
Your Home Based Mom

Friday, December 21, 2012

Graphic Organizers for Mom (Or How to Play Games With Your Mind)

For some reason, I dislike making lists for myself of things to do.  They tend to become taskmasters to me, and make me feel like I must get them DONE before my day or week is a success.  Typical first born, perfectionist, I suppose.  But I've come across another method for helping me organize tasks, that feels more like a game of Bingo or Black Out.  :)  Oh, the games we play with our minds!  I call it a Graphic Organizer for Mom, and I love how it organizes my want-to's and need-to's into nice tidy little squares.  Here's how:

Just take a piece of computer paper and fold it in half, and then fold each half several times until you have either 16 or 24 little squares.

Then as you think of things you WANT to get done and NEED to get done, write one on each square. I also write down some fun things I'd like to do.  This particular Graphic Organizer is for me over Christmas Break from homeschooling our 9th grade son.  I still have a few empty squares on it, so that I can add to it as I think of something else.

As you complete a task or a fun To Do, put a nice big X through it.  Ahhhh, doesn't that feel aaaamaaaazinnnggg?!  And it looks so tidy.  Plus it feels like I'm just playing Bingo with the goal of a complete Black Out by January 2.

Some of these things I am REALLY looking forward to...like beginning my new Smash Book Scrapbook. Playtime with paper!!

Other items...not so fun.  Like mopping the kitchen and sewing my husband's coat buttons on tight. But, because of this Graphic Organizer I really didn't mind doing it and then having the fun of crossing it off.
My photos today are subpar because I used my iPhone rather than my camera, but you get the gist.  
So give it a try and see if it makes you feel more organized and less mastered by a To Do list.
Works for this Mama!

Christmas Blessings!

Donna


Linked to:
Made By You Monday

Thursday, December 6, 2012

10 Minute Trees

This Christmas, I have had so much fun coming up with new Christmas displays for my home.    Partly because I didn't want to get out all of my usual decorations and have the work of putting them all away again in a few weeks.  Partly because I just wanted something different to enjoy.  One of those little projects has been to try my hand at Origami!  I found a website that visually showed pictures and gave instructions for making Origami Pine Trees. But since I am not good with geometry, (at all!), I also searched You Tube and came up with a video that showed how to make them.  The little tree above is one of the ones I made.  

I decided to do our mantle this year in the calm, peaceful colors of Aqua, Green, Silver, and White.  The plate is a North Star treasure I found at a flea market for a couple of dollars.  LOVE it.  It was my inspiration piece.  I already had the glass containers, teacup and saucer, and the vintage green copy of Little Women, so just added an aqua print fabric belly band around the book and put inexpensive aqua and silver ornaments in the glass containers.

The three trees were so easy and quick to make.  The link for the blog site that gives instructions on how to fold them is HERE.  And if you are like me and need a video to help you figure out the folds, then watch this ONE (just through 1:45 minutes of it, because then they do a different design than the simple one I wanted.)  The 3D stars came from THIS blog link, and were fun and easy to make.  I can't decide if my favorite tree is the aqua one with the green star, or the sheet music of Good Christian Men Rejoice (a photocopy of it) for the small tree.

These would be fun projects to make with kids.  You can practice on a square of computer paper first.  You can make them any size...just start with a square.  Add a loop of ribbon or embroidery thread at the top if you want to hand it from your Christmas tree.

Come back soon, and I will show you the Origami dresses I've made to hang on a Christmas tree.  Sweeeeet!

Have Fun!!

Christmas Blessings,

Donna
Linked to:
My Romantic Home
Funky Junk Interiors
Sunday Showcase

Sunday, December 2, 2012

A Vintage Little Christmas

My love for all things vintage is sparking some creative fun as I decorate the house for Christmas.  I am using some of my vintage belongings to make a few new tablescapes.  Here is the coffee table's new look for December.  The little old muffin tin is something I found at the flea market this past weekend, and I already LOVE it.

The same scene with the flash used, so you can better see what makes up the vignette.  

Eloise Wilken's book Baby's Christmas is a true favorite.  Both of my darling grandbabies have Eloise Wilkens cheeks and profiles!

The tin is holding miniature candy molds, Peppermint Pillow candies, and Scrabble tiles that spell Jesus.

With the flash, you can see my $2 bag of ABC blocks from this summer's garage saling is being enjoyed!  On the left is my childhood Christmas stocking, and I tucked in a few photos from my childhood Christmases in the 1960s.

That's me in the snow above right in 1967 and the lower photo shows my mom, my baby brother, and me with a large teddy bear in 1965.  :)

Lastly, this fabric underneath the display is called Dick and Jane at Christmas Time!!  Bliss!

Thanks for stopping in!

Christmas Blessings,

Donna

Linked to:
My Romantic Home
Funky Junk Interiors
Sunday Showcase

Monday, November 5, 2012

Getting Ahead, Holiday-Style


I LOVE to get ahead in my responsibilities.  It makes me feel prepared and better able to enjoy each day.  So a recent blog post really caught my eye.  It's called Stock Your Freezer in Just an Hour Each Week.  You can click on that title and be taken to Crystal's inspiring article.  :)  I love the idea of freezing meals and desserts to have on hand, but the thought of spending hours in the kitchen and dealing with sinks full of dirty dishes turns me off.  I homeschool our 9th grade son, plus have a thriving Etsy business, so I don't feel I have time to make a month of meals in one day.  So Crystal's idea of just spending an hour a week preparing something for the freezer really appeals to me.  She even suggests just spending 30 minutes at a time doing such.  

My husband and I have all of our adult kids,  2 little grandbabes, and parents coming to our home for Thanksgiving Weekend.  Can. Not. Wait!  I want to be able to really enjoy them all so I am thinking ahead about what I can do to get ahead of the game, food wise and cleaning wise.  Today I had so much fun preparing one thing for the freezer, and now it waits there, ready for holiday baking.  Yippee!  I'll take you on a photo journey of my first one hour freezer cooking adventure, which I divided into two 20 minute segments.

Peanut Butter Blossoms are one of our VERY favorite Christmas cookies.  I'd like to have some to serve over Thanksgiving Weekend, since that is when my grown kids will be home.  During a break from school, between Grammar and Math, I got out the recipe and made the cookie dough.

All good Christmas Cookie making starts with Christmas music on Pandora...


And donning the apron my so-loved Grandma made for me when I married in 1984....
One recipe makes 3 1/2 dozen.  Easy to mix up the dough during my break. (Then, back to school and lunch before I came back to finish this job.)

Roll into balls and roll in sugar

And now for the surprising part...I put the cookie balls on plates to FREEZE!  I'm not a huge fan of cookies that have been frozen.  Nor of making cookie dough AND baking it all in one setting.  I'm a short-project kind of gal.

I had two plates full of cookie dough balls...into the freezer for an hour and 15 minutes of while I cleaned up lunch and finished school with my son.

Took the plates out of the freezer.  Two plates of amazing cookies ready to bake and top with a Hersheys Kiss.  Bliss!  Fresh baked cookies will only be about 15 minutes away, whenever I decide to bake them.  Nom, nom, nom.

Lickety split, I slid them off the plates and into a gallon freezer bag.  Zip it up, easing out the air as I go. And just for the fun of it, I tied a red bow around it.  Christmas Cookies just waiting to be baked.  (Can you tell, I'm excited!)

I wrote the cookie name on the bag and the oven temp too.  My recipe never had the minutes of baking written on it, so every year I have to figure it out again.  Sheesh.  :)

I am visualizing baking half of these at Thanksgiving, and saving the other half for Christmas.  Wouldn't these frozen cookie dough balls make a fabulous gift for a friend, neighbor, teacher, or your Pastor's family?  You could wrap them cute, and add a nice tag.  We sometimes are given too many cookies at Christmas, so being given frozen dough balls might be a real blessing for your friends to bake and use at whatever time they need them.

I'm planning to make 2-3 more types of cookie dough balls to freeze before the holidays.  Also several pies (baked), a frozen dessert, and our Thanksgiving Sweet Potato Casserole.  Any other ideas from you readers and friends?

Hope you are inspired!


Blessings and Happy Getting Ahead!

Donna

Linked to:
Sew Many Ways Linky Party

Thursday, October 4, 2012

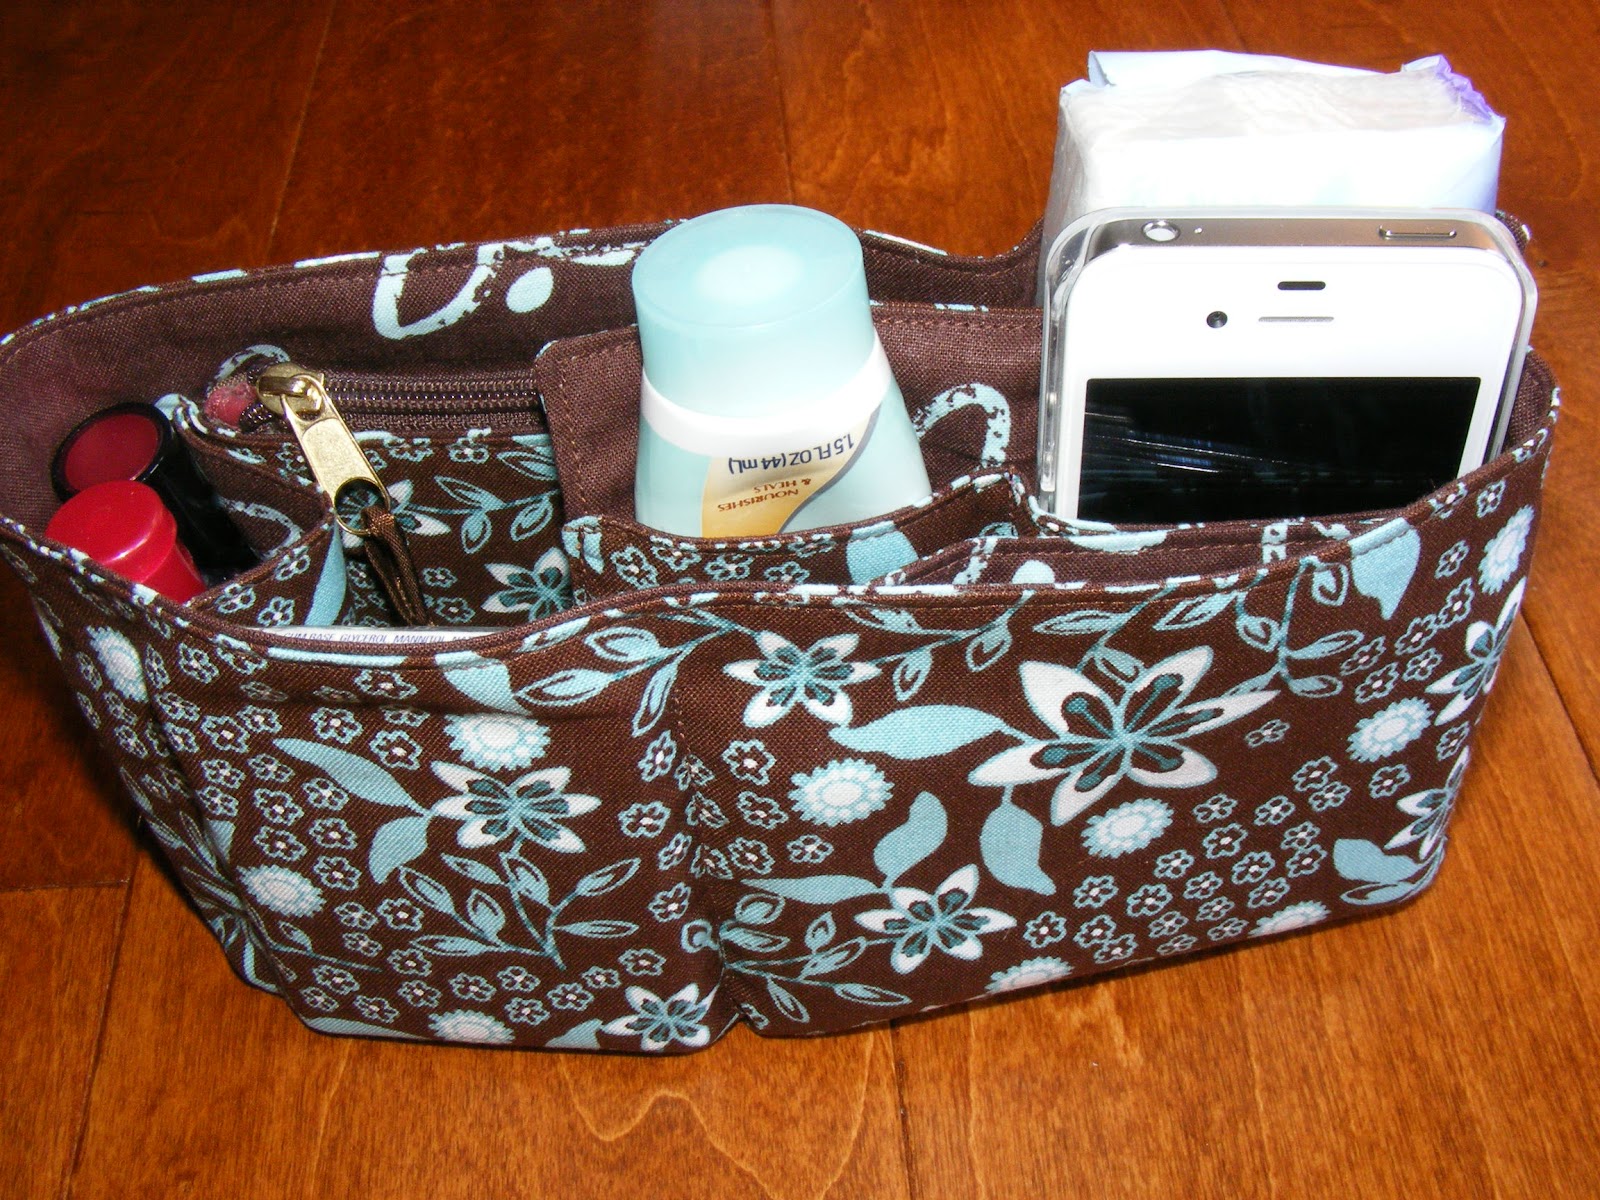
Purse Organizers Make Great Gifts!

A year ago, I followed a simple tutorial from a blog and made myself a purse organizer.  I blogged about it HERE and this link will take you to the blog where I first found it featured.  :)  I've used it everyday since!  LOVE it!  Keeps my purse tidy and makes it so much easier to switch purses.

Since I like mine so well, I am making them for my Etsy shop, Perfect Darlings.  If you are the crafty type, go for making it yourself!  And if not, head over to my Etsy shop and see if you are interested in one for yourself or a gift. These would make such nice gifts for b-days, Christmas, or any other occasion.

I'm just going to let the photos show you the prettiness and the usefulness of these little beauties.


                                                                      Blessings!
                                                                       Donna

Linked To:
Sew Many Ways Linky Party
07 08 09 10
Pin It button on image hover