Saturday, July 16, 2011

Gift to Mail in a Card #2

While blog hopping this morning, I came across the cutest idea for making bookmarks.  And realizing they are the perfect little handmade gift that you can tuck in a card to mail, I put it on my fun 'to do' list for today.  Please visit KR Creations, as she is my inspiration and idea giver for today's craft.

Take a piece of cardstock (the thin decorative paper won't work as well as heavier cardstock-type).  I especially like the kind that is double sided, since it gives you some coordinating paper to use as trim.  Cut a piece approx. 4" x 3.25".  Two of mine are alittle larger than that.  Fold the paper in half.  Use a sewing machine to sew the top and right sides together.  Insert ribbon first, if desired.  On examples #1 and #2, I also sewed my contrasting paper on before sewing the top and sides together.  Leave the left side and bottom of the folded paper unsewn.

Embellish with a favorite phrase, buttons, punch outs, etc.  Your imagination is the only limitation!


This one is made from cardstock that is printed with vintage children's phonics images.  So so cute!  I added the matching strip of plaid paper along with a circle punch out and 2 buttons, slightly off-kilter for more interest.

I forgot to add ribbon at the top of this one before sewing it together, so I just made a paper loop and added it to the top, gluing it to the back.

Isn't this paper cheery! 

And oh so true, that books take us on wonderful adventures.  :)  The book I am reading right now for pleasure is set in Carmel-By-The-Sea, California.  Happy sigh.


This craft was so fun, easy, and quick.  In just a small amount of time I have three gifts to give.  I enjoyed sewing with paper...no raveling edges!  I would like to make more using an old map, a page from a vintage children's book, and sheet music.  It's fun to send a little surprise along with a card, and these will easily fit that endeavor.  These would make cute party favors or craft show merchandise, too.
Which one is your favorite?

Thanks for stopping by!
Blessings,

Thursday, July 14, 2011

Simple Blessings

May our gorgeous little visitor...

...with his God-given beauty and grace...

...bless you, encourage you, and make you smile and chuckle today!  The birds planted these sunflowers below my birdfeeder.  And now they are getting to enjoy the harvest.  Oh, how I love it!
Blessings,
Donna 

Linky Parties:
My Romantic Home 

Monday, July 11, 2011

DIY Travel Binder

We have taken two wonderful trips this summer!  And I knew I'd want to chronicle them in a memorable way, without all the time and brain power involved in scrapbooking.  Finally this idea came to me, and I LOVE it.  I want to share it with you, in case this would fit your style too.  I took a 3 ring binder that I already had, with a clear pocket on the cover.  Made a cute but simple cover page for it using my computer for the print, and a darling old Susan Branch calendar for the pics.  My fishing pole is just a twig from the yard with a piece of twine.  I slid the cover page into the clear cover pocket.

My fishy is lame...but I'm A-Ok with that!  He's a happy little fishy!  I am not going for perfection, so I just taped the fishing pole to the paper, and used double sided acid free tape to attach the pics.

I filled the binder with page protectors from Walmart, as well as some photo pocket pages to hold little momentos.  This first page is starting to tell about our Lake House Family Gathering in early June of this summer.

I purchased a cute little paper pad at JoAnns that was a travel theme.  Cost me about $1.25 on sale.  I am using it for some quick, easy journaling.

Here is one of the photo pocket pages.  I thought it'd be fun to include my packing list, the state of Missouri cut out from an old map I got at a garage sale, and our ticket stubs from the St. Louis Arch which we visited on Day 1 of our trip.


In addition to brochures and such from St. Louis, I printed out the info on the Lake House we rented...it was a huge, beautiful home that easily held all 22 of us!  I also created a photo book at tinyprints.com of the photos that I wanted to remember of our week.  So it will eventually reside in a page protector in this book too.  For now we have it out, enjoying it.

Next up, our big trip to Disney World in Orlando.  I purchased a Mickey Mouse paper at JoAnns, and this adorable cut out of Mickey is a post card from Disney World.  I won't be attaching it to the page, b/c it will also become a Christmas tree ornament in December.  I will attach a photo of our family at Disney to the back, write the dates of our trip, and punch at hole in the top where some red ribbon will allow it to hang on the tree.  Fun reminder in December of our trip in June for only $1.95.  :)

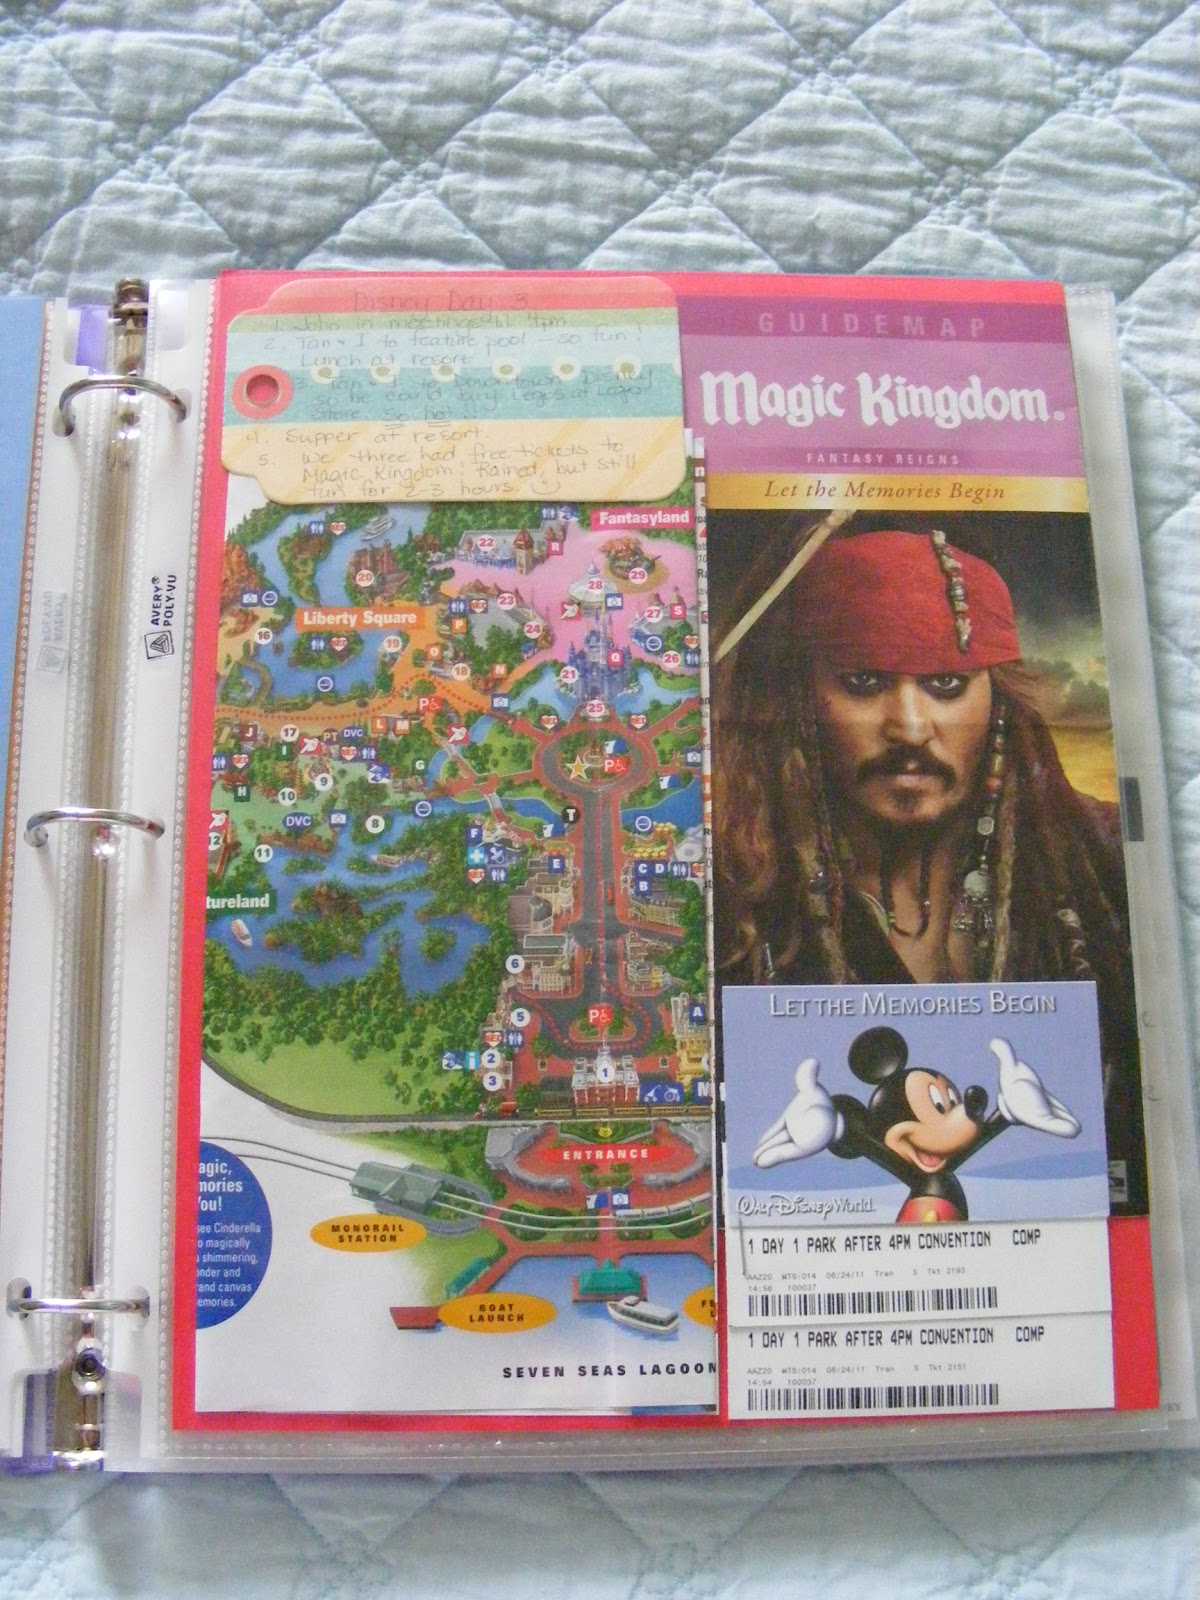
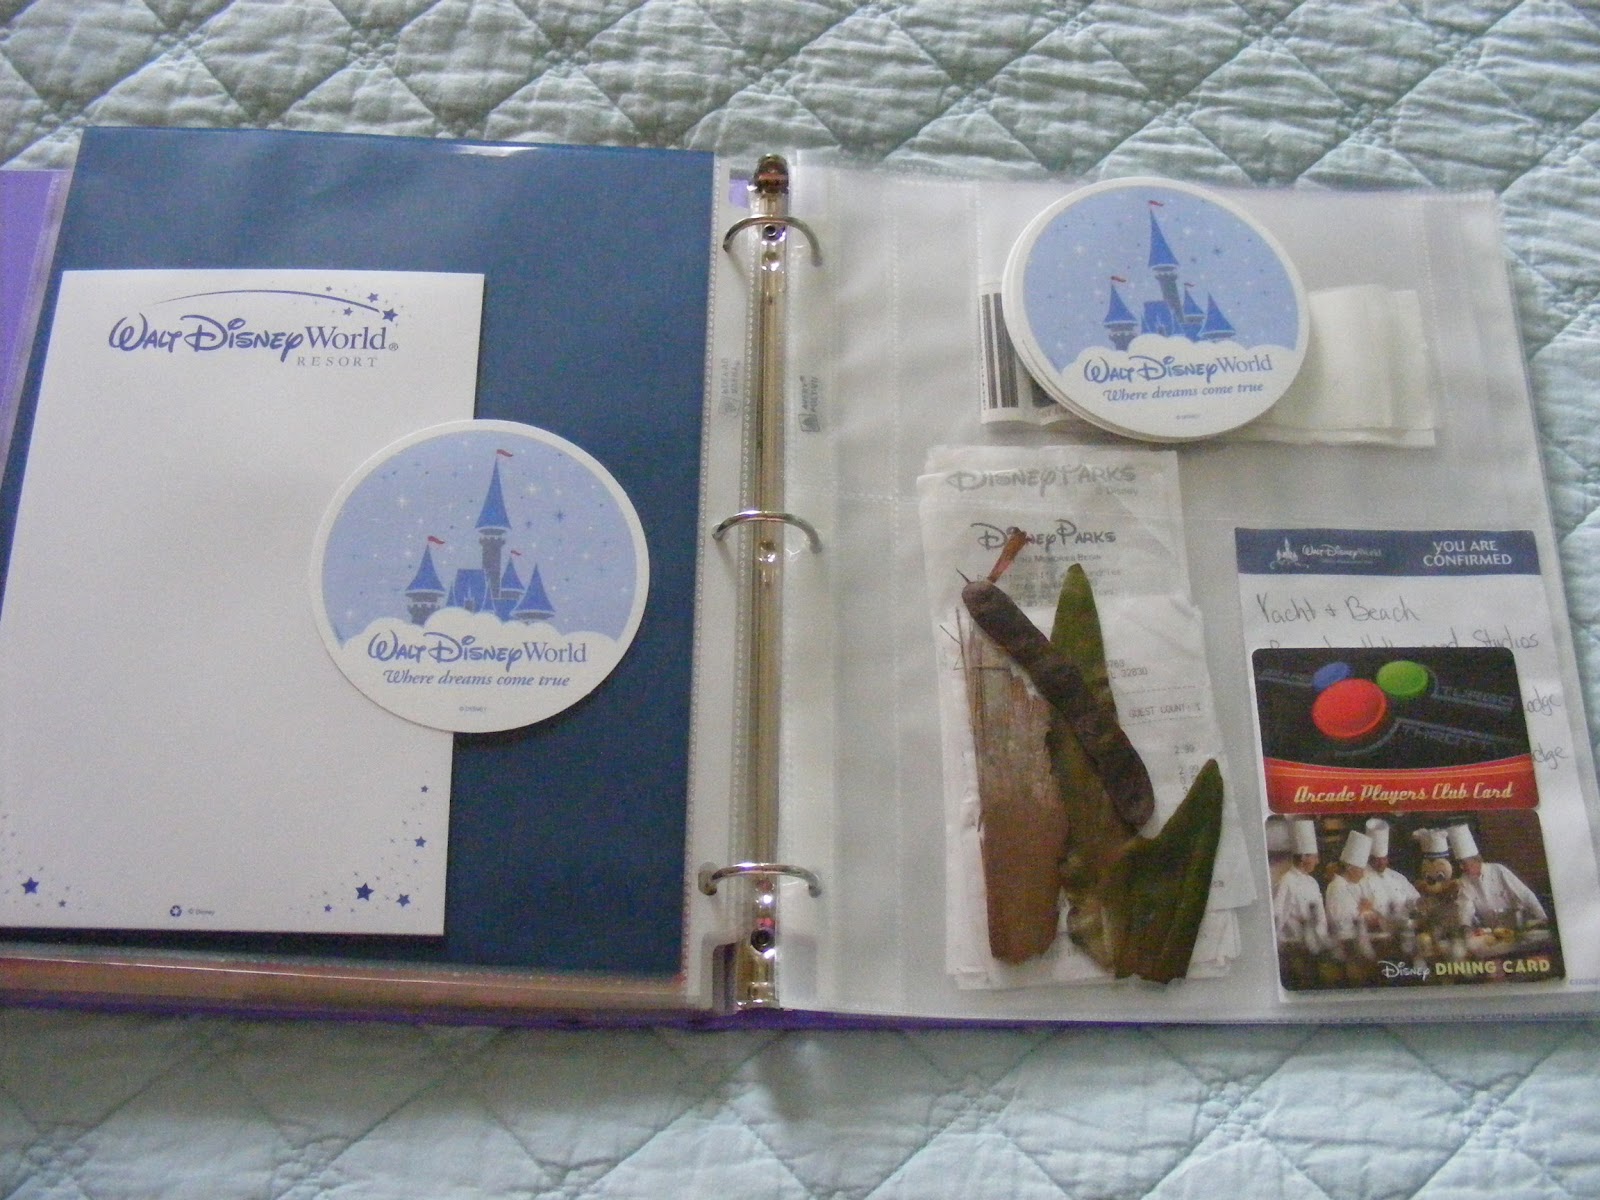
I kept all the ephemera from Disney that I could.  And I even took this binder on the trip with me, so that during quiet rest times in the hotel, I could begin to put it together.  Best idea ever!  I came home with it more than half way done!

If you've never been to Disney Resorts, the above left little cardstock envelope held our plastic room key-cards which were ALSO programmed with the theme park tickets we had purchased!  So handy!


A map of our Disney resort, a Downtown Disney map, the cut out of Florida, and the menu from our first Disney Resort meal.  :)  I will just barely tack these brochures/maps to the underlying scrapbook paper so that we can take them out and look at them anytime.

Map of Epcot,  Day 2 of our stay.  I wish my photos were brighter, but I couldn't use a flash due to the shiny page protectors.

We had an after 4pm pass to Magic Kingdom one night...the map and our tickets.

The bag from the Lego store where our son made fun purchases, and a Disney store bag that held some candy we bought.

The papers from the Lego things Tanner bought.  How that will bring a sweet-sad smile to my face one day when he's too old for Legos.

I kept the stubs of some of our Fast Passes from Hollywood Studios!  And made a page to note that we went to see the new movie Cars 2 one night.

These pages and pockets hold our hotel room notepad and paper coasters, some gift cards we used, and a few pieces of flora I picked up on the resort grounds...a piece of Palm Tree bark, part of a Palm leaf, a seed pod, and a tiny blossom.

I hope you enjoyed my Travel Binder tour!  I will be printing out lots of photos from Disney too, but this is what I have completed so far.  Easy.  Inexpensive.  Quick.  And makes a fun book of memories for the future.  Wonder where our next vacation trip will be?

Blessings,

Sunday, July 10, 2011

My Wild and Loveable Gardens

Everyday I go out and check my flower, herb, and vegetable gardens to see what's growing and what bugs need shooed away.  Tonight when I went out, this breathtaking Gladiola was hiding behind the gigantic sunflowers.  Isn't God the perfect artist?! 
My Morning Glories are getting wild and full.  They will start to bloom in another week or two and will give the back neighbors a glorious show each morning!

Aren't baby vegetables the cutest little things?  I am getting such a kick out of the tiny little okras coming on!

I'm excited to eat beets soon!  I like them cooked and buttered or pickled.  These are so cool...they are a long narrow kind.

Baby pickles in the making.


Did you know that if female zucchini plants don't get pollinated, the little baby zuke will die?  I am going out everyday to hand pollinate them, in case the bees don't find them.

Most precious of all...itty bitty baby pumpkins!  They are growing up a vegetable trellis.

And here she is!  The Square Foot Garden!  She's done a great job...we've had lots of lettuce and radishes.  Now green beans, zukes, and cukes.  Soon everything else!  That little vine on the right end is a mystery.  I'm letting it grow up some twine, just waiting to see what it is.

My flower gardens started out so neat and orderly.  Now they are getting wild and wooly!  But in my quest to conquer perfectionism, I am finding it all to be unique, adorable, and loveable.  Even though the gladiolas are falling over with weight, the Butterfly Bush is all over the place (it started out 6 inches tall this spring!), and the Bee Balm is taking over.

Didn't have much hope for my Verbena to make it...it looked so puny and sick this spring.  But she is showing ME!  So sweet.


I love sunflowers.  I planted seeds from one packet and they are coming up different sizes and heights!  This one is about 9 feet tall!!  And is a beautiful rust colored.

The birds planted these, right below the bird feeder.  They have each one been perfect and so cheery.  All different sizes too!  The bigger one has begun to fade, but the Goldfinch birds are enjoying eating the seeds.

My very first Lupine ever!!

"Mama, please let me come outside again.  I promise not to eat anymore of the brillo pad Daddy used for cleaning the grill and left laying in the grass...."

And lastly, before coming in, I enjoyed a hug from the Lord...this little Goldfinch feeding nearby.  I am soooo thankful He made blooms and birds.
Thank you for dropping in to visit!
Hope your heart was cheered by time in a garden.

Blessings,
Donna


Linky Parties:
Sunday Showcase
Don't Waste Your Homemaking

Tuesday, July 5, 2011

Decorating With Dishes

I love dishes.  I come from a long line of dish-lovers.  So consequently, I have more than my fair share of pretty dishes collected from thrift shops, garage sales, antique stores, and department stores. I've realized that a great way to enjoy these pretty plates, bowls, tea cups, etc. is to use them in decorating. Today I just want to show you some things you can do with your favorite china, glass, and pottery pieces so that those pretties aren't just tucked behind glass in your china cupboard, but they are out where you can see and use them every day.
I requested these adorable, chubby little Crate and Barrel bowls for my b-day a few years ago.  They live on our stovetop as a cute vintage touch, holding a tin cookie cutter, tiny wire whisk, a cinnamon stick, and a coffee scoop.  I love them...and I need to remember to use them for serving more often!

My mom in law gave me the darling polka dot plates for a gift!  So cute!  I decided to leave them out on my kitchen counter as a part of a little display, so I can enjoy seeing them and use them often as well!  The plate in the back of the plant is a black and white New York City plate.  I swap it in and out with other plates in my collection, to fit the feel of each season.  The little green bowl is an antique from my husband's grandmother's home.  I enjoy floating a large flower in it or just using it for a wee bit of storage now and then.

Our kitchen/dining room wall...this is the only thing on this large wall and it just fits our home.  The three plates I purchased at Home Goods to go in our green and white kitchen...decorating with plates is very inexpensive, and allows you to change your design whenever you want without alot of work.  This wall is a happy-wall, to me!

My parents were downsizing last fall, and this pottery piece from their wedding gifts 51 years ago didn't make the cut.  I LOVE it!!  And it's been a special piece on our living room lamp table ever since.  It's pretty, earthy, and a piece of my family history.

Not only are dishes a beautiful, inexpensive tool for decorating, but they create 'story' vignettes throughout your home.  The green and white tea cup was brought to me by my sis in law from Romania.  I love it AND the church plate which I found at Goodwill.  I change out the plate on my mantel according to the season.

This piece was made by me from pieces found at Goodwill.  The cloche was a cheese tray lid.  The plate was something I already had, and I glued a sweet cut glass goblet under it to act as a base.  

Another heirloom from my mom...this aqua relish dish was also one of her wedding gifts.  I used it for a relish dish for years, but now use it on my bedside table to hold vintage costume jewelry, some nail polish, and some of my own everyday jewelry.  I love that it matches our aqua, green, and white bedroom so well and that I can enjoy seeing it everyday rather than 3 times a year.

I bought one place setting of this vintage aqua Pfaltzgraff set at Goodwill 3 years ago.  Our daughter was getting married and her wedding colors were black and aqua, so I just knew I'd use it for something with the wedding, and I did.  Now I am using the pieces in our bedroom/bathroom.  I have one of those amazing, pricey LUSH bath bombs, which I can never quite bring myself to use!  So I wrapped it in aqua tulle and it now decorates our garden tub in the master bathroom.

One of my favorite vignettes...I created this for my mother's 70th B-day Luncheon back in April, and I love it so much, it continues to grace my china hutch.  Just pieces that I already had along with antique gloves.

A round wooden tray that was a wedding gift for my husband and I 27 years ago is such a versatile piece in decorating.  Right now it's on our dining table along with a vintage footed green dish that I love (it's for sale in my etsy shop) and this darling little green custard cup that I got for Christmas...it's holding my daily vitamins, rather than being always tucked away behind cupboard doors.


The rest of the place setting of aqua Pfaltzgraff.  The bowl is upside down, functioning as the perfect pedestal to the dinner plate.  Layered over that I have a white hankie, a beautiful piece of my dear friend Lori's mother's pink depression glass, and then a sweet little tealight candle.  I love this on our dresser.

Two little vintage glass salt and pepper shakers make the sweetest little bud vases.  I'm so enjoying these this summer with cuttings from my gardens.

And lastly, I recently decided to use this darling Pfaltzgraff tea cup set that I've had for decorating inside my house for about 4 years, and use it to make a tea cup bird feeder for my front flower gardens.  One less thing to dust in the house, and a new sweet way to enjoy the tea cup!  The shape, size, and decor of this set were just perfect for a bird feeder.  I also have some similiar ones for sale in my etsy...the shop is listed in my sidebar if you are interested.  The tutorial for making your own tea cup birders is HERE.

Thank you so much for joining me on this little dish display!
I'd love to hear about and see pictures of how you use dishes to decorate in your home and garden too.

Blessings!

Donna

Linked to:
Tip Junkie
Someday Crafts 
My Romantic Home 
Don't Waste Your Homemaking 
Very Merry Vintage Style
07 08 09 10
Pin It button on image hover