Monday, June 20, 2011

A Lovely New Chapter Ahead

My husband and I have entered a lovely new chapter in our lives...our daughter is expecting our first grandchild!  I think I was born to be a mama and a Mimi...so I am excited and ready!  That's me with a future granddaughter up there above...hee hee!

Our first born, Lindsey Brooke, is our only daughter, and therefore is the family princess.  Now she will be giving birth to her own little Prince or Princess.  She's 10 weeks, and due in mid-January.
I'm taking my Mimi job seriously. ;) Bargain shopping for things for our grandbaby...to have at his/her house or to have at Papa and Mimi's house.  Just wait til we find out if it's going to be a Prince or a Princess!  Then my sewing machine will start humming too!

Congratulations Rich and Lindsey!  You will be excellent parents and will love this new journey that will last the rest of your lives.  Children are a blessing from the LORD.

Blessings,
Mimi Donna

Thursday, June 16, 2011

Felt Flowers Headband

Can you tell it's only my 2nd week of summer break at home?  I homeschool the rest of the year, and don't have alot of time for crafting.  Now that summer is here, I find myself making something every day!  Bear with me.  :)  I wear alot of these store-bought kinds of headbands, and have been wishing to dress them up for weeks.  My niece Kara of Sweet Baby Cakies had recently made some melted felt flowers and told me how to do it.  That's exactly what I had wanted to do with my headbands, so today it was on my schedule of things to do.
I used my circle punches to make 2 paper patterns...one smaller and one larger.  Then using white felt I cut out three of each size.  Perfection not required as you will see.

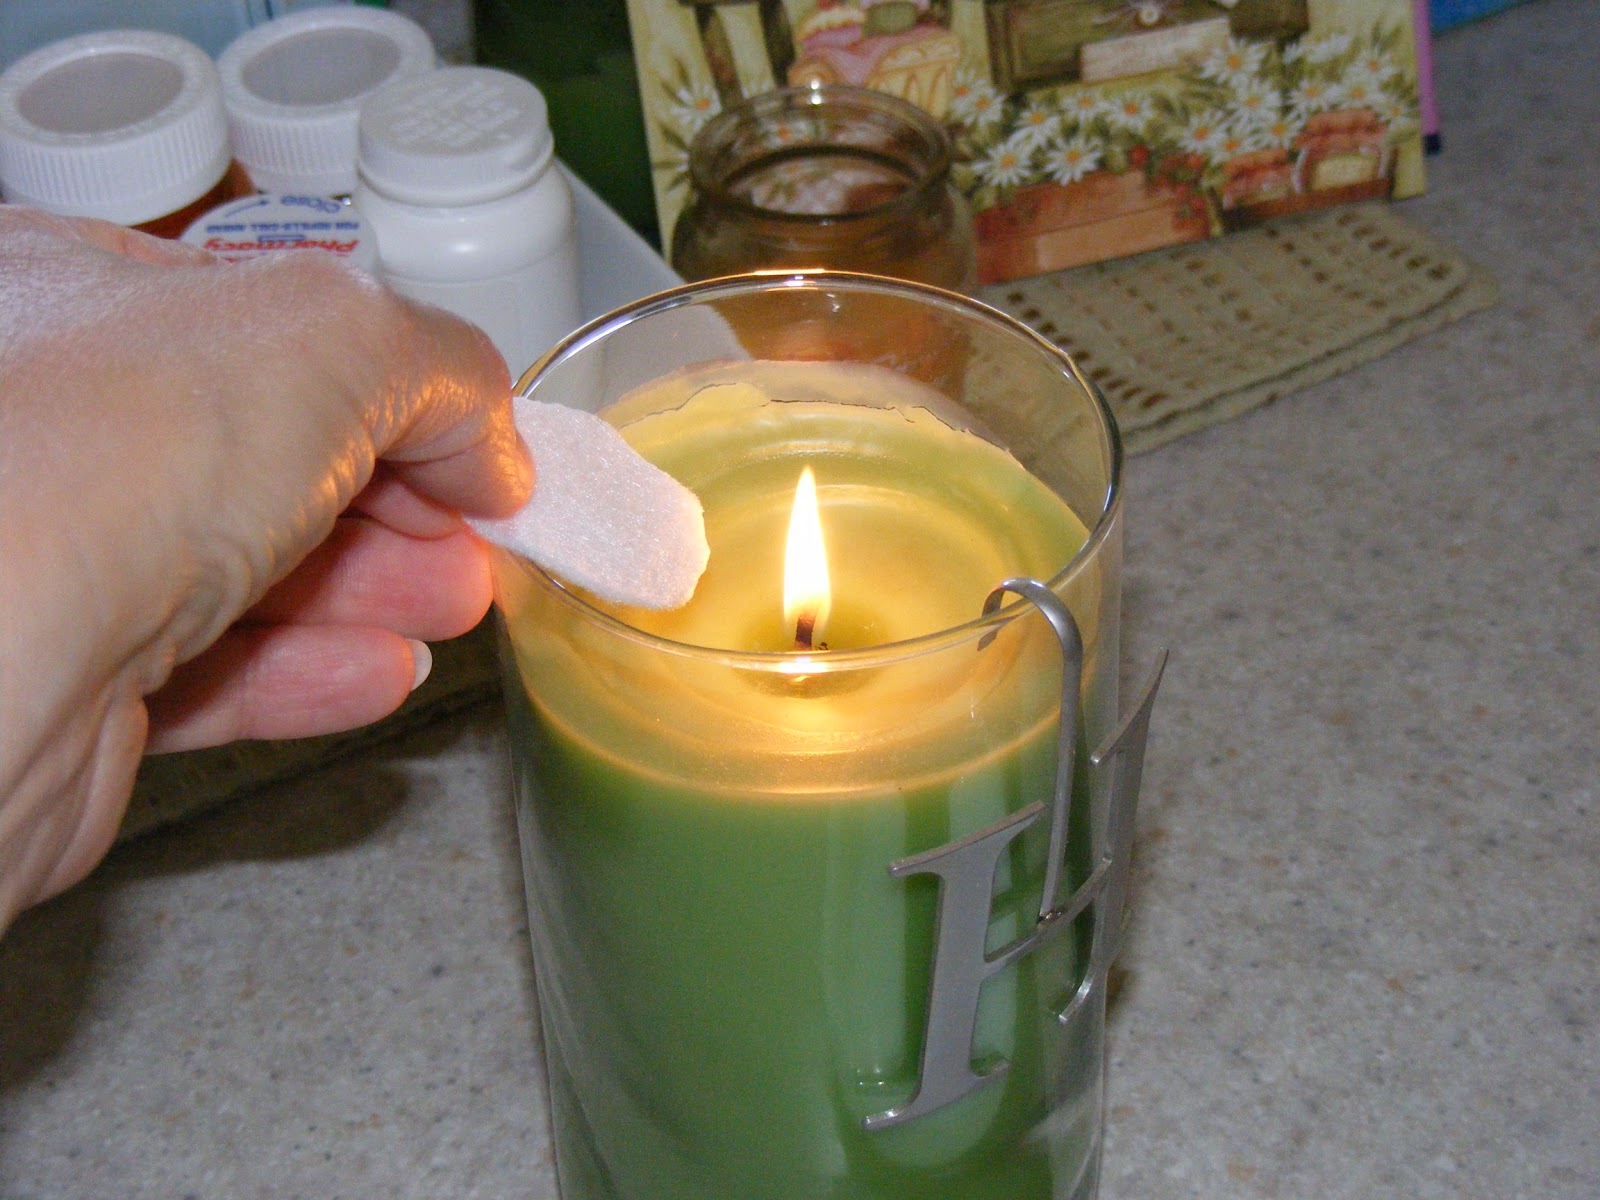
I then lit a candle to use as the flame that would gently melt the sides of my felt circles, and had a bowl of water nearby for dousing any accidental flames!  Didn't need it, thankfully.

I held the felt circles near to the flame.  Sometimes beside the flame and sometimes above the flame, aiming the edges of the circle toward the flame.  It was really cool to watch how the felt would shrink away from the flame as it slightly melted and circled on the edge.  My fingers got alittle hot when I'd have to turn the circle and hold the already-melted edge, so I used tweezers to hold the felt at times.  Just gently go around the whole thing until it has melted and curled a bit.  Try not to scorch it but if you do just a little bit, snip that part off.

Can you see the right side has alittle bit of a hard edge to it?  It's been melted.  The sides with fuzz still on them have not.

The edges do not melt in a perfectly uniform way, so that's why a perfectly cut circle is not needed at the outstart.

All six felt circles have been melted to the size and shape I want.

Whenever possible, I like to make-do with whatever supplies I have on hand.  These vintage beads were purchased in a lot at a garage sale for $1.50, so I just hoped there would be beads in here that would be the right color.  Notice that the beads were the craft supply that I finally decided to put into my new milk jug caddy...read about it HERE.

Bingo!!  I was thankful to find a necklace among the bunch with the perfect color periwinkle blue beads!  Thank you Jesus!


Now to sew them together.  I sewed the bead to the double layer of felt circles, being sure to keep my stitches hidden under the top circle.  Used a double white thread and a craft needle to do this step first.  THEN I sewed the flowers to the headband.


I overlapped the felt flowers a bit as I sewed them to the headband, taking care to hide my stitching as much as possible.

Finis!!  Son Tanner again was my photographer, so hopefully you can see the finished product ok.

In love.  Smitten.  Like alot.
Blessings,

Wednesday, June 15, 2011

Favorite New Summer Sandwich

Several years ago I tore this recipe out of a BHG magazine, thinking it looked good to try.  Yesterday was the day! 
I boiled and peeled some eggs, microwave cooked some bacon, thin sliced an English cucumber, and washed some fresh lettuce leaves from our garden.  Sandwich fixin's are ready.  Mmmmm.
Walmart has some really tasty French Bread for 98 cents everyday in their bakery.  I'm buying it these days instead of turning on the oven for baking my own.  Cut two thick slices, buttered them a bit, then toasted them.  They can also be grilled on the stove.
Layer the eggs on the bottom slice, then salt and pepper to taste.  Next came the bacon slices, lettuce leaves, and cucumber slices.  Top with some light mayo or mustard if you prefer.  I did not add the basil leaves the recipe called for.

Incredible!  Filling.  Tasty.  Different.  Summery.  A Hit!  And nice enough to serve friends for a casual supper or lunch.
Enjoy!!

Blessings,
Donna 

Tuesday, June 14, 2011

Crocheted Headband...In Under One Hour!

  This morning I came across a cute, cute, cute tutorial for a crocheted headband...now I don't know how to crochet, but this was worth learning for!  The credit all goes to Lolli of Better in Bulk who posted this amazing craft.  Please visit her blog HERE.  And the tutorial for this is HERE.
My parents were coming over for lunch today, so I asked my mom if she'd teach me how to crochet this little beauty.  Mom brought yarn and a bajillion crochet hooks (which I kept accidently calling needles!)  With Lolli's  great instructions, we were off and crocheting!

Isn't it so so so cute?!  And it took us about 45 minutes.  I think that if you know what you are doing, you could do this in 30 minutes or less.  It was really fun!  You add a button to the center, so I found this silver bead that was just right for me.

This is how silly I look trying to photograph myself in the mirror and get the headband in at the right angle.

Kookier still!!

Thirteen year old son to the rescue!  Even though he thought it was nutty to try to take a picture of his mom's new headband he did a fabulous job.  And see...it even matches my shirt today!

I am smitten!  And I will be making more!  And more...til I am good at it and quick at it.  What wonderful gifts these would make.  If you crochet, give it a try.  If you don't, find a lovely lady to teach you.
Enjoy!!

Blessings,

Monday, June 13, 2011

It's The Little Things....

It's really the little things in life that make me excited!  Such as these sweet, old-fashioned cannisters on my counter, that have been sitting 'naked' for months while I longed to label them in some cute way.

Today they got labeled!  With "courier" font...my vintage fave right now.  And with green polka dot paper.  I just printed the labels, glued them to the paper, cut them apart, and used clear packing tape to attach them.

This sweet old jar came to me as a gift, bearing homemade granola.  Too cute to put in a cupboard, it become my baking soda jar.  So handy when baking.

This was a spice holder that got used up...now it also holds baking soda and is sooo handy for using as a mild abrasive on dishes or the counter top.  The shake top under the lid is the key.
More little things...my herb garden grew more than the weeds while we were gone last week to a lake house family gathering.  The smells of basil, dill, cilantro, and sage just make me want to eat fresh!  Can't help but walk by and rub a few leaves with my fingers so I can smell those heady aromas.

This little thing is a new Rosemary plant...on clearance for $1 at Walmart.  Yay!

My cinder block gardening is going great.  Asters came up by seed as well as African Daisies, Morning Glories, and the Gladioli bulbs are 18 inches tall.

The square foot garden is also producing well. Picked enough romaine lettuce to make salad for the neighborhood!

Our first baby zucchini!  I'm a happy Mama.
My kitchen calendar page for June is a cottage by a lake...another fun little thing!  We just spent 4 days at an amazing lake house with the whole Hayden clan in the month of June.

I don't have a clothes line, but I can take my drying rack out into the sun.  A happy 'little thing'.

And lastly, another sweet little thing...journals make me feel obligated to write too much, but this little Mary Englebreit daily planner gives me just a few lines to record the highlights of each day.  I love having these little journals to look back at from the past 7 years.
What little things are bringing fun, love, joy, happiness, and sunshine to your days?  Did you see the quote at the top of my journal page for May 9-15?  I love it.

"Life isn't a matter of milestones but of moments."

Blessings,

Sunday, June 5, 2011

Milk Jug Lego Caddy

Last week I had a great time changing an empty plastic milk jug into a cute little caddy for me!  You can read about it and see a tutorial HERE. When we finished up another jug of milk, I made one for my 13 year old son's Legos.  He's loving it and ready for me to make more!
As seen in the previous caddy tutorial, I cut the jug and cleaned it well.  I would have liked to cut some Lego pics out of one of my son's many Lego magazines.  But, he just couldn't bear it!  So instead we googled "Lego Clip Art" and found some free ones online to print.
I also typed up the word "LEGO" and printed it out to add to the caddy.  After the Mod Podge dried, he had the fun of loading it up.  He was surprised with how many bricks could fit.

I engaged him to take some of these photos...he came up with this shot himself.  Fun.  :)


We put another pic on the backside of the caddy.  The handle makes it easy to carry the caddy from place to place.
So here it is, on his bookshelf.  Dear son must have thousands of Lego pieces, so dear Mama is very much ready to provide more and more caddies to house this wonderful toy.  Give it a try!  Easy.  Quick (15 minutes?). And free! 
Blessings!

Friday, June 3, 2011

I did it!! The Story of Remaking a Dress

I LOVE to wear dresses in the summer.  Cool and comfy and non-binding.  There are very few dresses to purchase, out there, that cover you on top well enough and aren't too short for a late 40's girl like me!  So I snatched up this dress last summer for $8 and was thrilled.  Til hubby saw it on me.  He said it looked like a bag.  No shape to it.  Boo!  : )  Today I put the dress on, found it to be oh so comfy, and decided to make it FIT me!
I used to be afraid to really alter clothes.  I'm a perfectionist.  I didn't like that it wasn't perfect when I was done, and I'm not patient, so I didn't want to spend hours making it perfect.  Blogland has helped me get over that!  Yay!  So the first thing I tackled was the sides...making it have a more fitted waist.


Next I took up the hem about 1.5 inches so it wouldn't be quite as long.  Not too short though b/c I have these skinny birdy legs that don't tan very well.  Ha!

Backing up a bit, after taking up the sides above and below the waist, I cut the extra fabric from the seam so it wouldn't be bunched up.  Then pressed the seam flat on the outside of the dress.

The next problem with this dress besides it being a bit too long and having no shape to it, was the sleeves.  They were kind of 'heavy' looking and droopy on me.  Did nothing for me and weren't cute.  So I decided to alter them.

This summer dress has nice little cap sleeves and it was my inspiration for the redone sleeves of this dress makeover.

I used a dinner plate to give me a nice uniform curve for cutting off the sleeve.  A fabric marking pen quickly made the line for me.

And with a bit of fear and trembling...I cut off the sleeves into a cap sleeve shape.  This next part was THE hardest.  Pressing a little double rolled hem into place and carefully stitching it into place.  Took awhile!  But oh so worth it.
So here's a reminder of the straight, bag dress with the droopy sleeves.

And here she is! The "new" dress!  It's fitted around the waist instead of just hanging on me like a sack.  It's a wee bit shorter.  And the sleeves look soooo much better and feel better too.  I want to make a fabric flower pin for embellishing it, but found that this sweet pin my niece made goes with it quite well!  Add some cute black wedge sandals and I'm ready for dinner at Culvers and alittle Walmart shopping with the family.  

The true test of whether my handiwork was a success?  My husband.  He told me at home that it did indeed look soooo much better on me.  But the best compliment was at Walmart as I sashayed down the aisles with my cart...he was behind me making little comments as we went.  Nice comments!  Hee hee!  So the moral of my story is, give it a try on something that you aren't afraid to experiment on.  I figured if worse came to worse, I'd wear this dress around the house.  Instead, it turned out well, and I can wear it wherever I want.  Thank you Jesus!!!

Blessings!
07 08 09 10
Pin It button on image hover