Tuesday, March 18, 2014

Upcycled Knit Top...From Too Short and Too Low to Sassy and Sweet!

Once upon a time, this pretty cotton knit top fit me well.  I loved the print and the colors.  Plus 3/4 sleeves work for almost 3 seasons for me here in Southern Indiana.  But then, after some washings and partial dryings, it became too short and the neck line began to stretch and be too low.  Rather than put it in the Goodwill pile, I started researching ways to upcycle it.


Then one Sunday at church, I saw such a cute top.  It was made from some kind of Chiffon type fabric and had a lacy gathered 'skirt' around the hem.  Ooohhhh.  I liked it!  And then I remembered I had some white lace in my fabric stash.  And within an hour, I had an upcycled top!


I just cut a piece that was about 8 inches wide and about 1.5 times longer than the bottom edge of the top.  I sewed a basting stitch along the top of the lace in order to create slight ruffles in the fabric.  I pinned it with, inside the existing hem of the top, trying to keep the gathers mostly even all the way around.  Then I sewed it in.  


I also took up the neckline about an inch by increasing the seam on each shoulder.  And lastly added a lace panel above the pink crocheted neckline decor.  

I left the lace unhemmed, as I like the slightly shabby chic look.  It washes up great and does not ravel.  I even made a little lace embellished pin to wear with it, as seen in the 2nd photo, but mostly will wear it without.  

So enjoying my 'new' top that now fits nicely and has a sassy little lacy skirted hemline.  This is my 2nd or 3rd attempt to upcycle or refashion clothing.  Such fun...can't wait to try something else!  Thanks for reading!

Be Blessed,

Donna

Linked to
lMy Romantic Home
Tip Junkie


Wednesday, January 29, 2014

My Valentine Mantel


On our way to the cheery sights of Spring, I'm glad we have the cheery colors, sights, tastes, and celebrations of Valentine's Day to enjoy.  I had so much fun making and hanging the Valentine Bunting over the fireplace this week, that I had to go ahead and switch the mantel from January decor to Valentine Decor.  So...here we go!


The window is the anchor piece of my mantel display.  It was $2 at an antique store in Northern Indiana, and I love it!  The view 'out' the window changes with the seasons.  :)  Pretty raspberry colored berries help cheer up the view for this month.  I love to have a seasonal plate on the mantel, and this one came from Home Goods several years ago.  The old burgandy hymnal raises it up to the right height, and a pink and white tea cup goes well in the center.  The gorgeous teapot on the left was a gift from my neighbor when she was dividing up her relative's belongings before an estate sale.  It comes from England, as does the teacup.  My little almost-matching creamer is Bavarian...so beautiful, and from my Mom in law's china hutch.  Love it!

I used an old piece of sheet music from 1965 to make this bunting.  Petite Gavotte is French for Little Folk Dance.  So sweet.  The hearts are made with my Cricut machine and a punch.

The piece with the title of Petite Gavotte was supposed to be at the far left as the beginning of the muscial bunting.  But the best laid plans often go awry, and here is ended up at the end of the bunting.  Oh rats.


This Fire King plate is a Christmas gift from a dear friend.  I do love me some Fire King!  And that adorable little girl is my 6 year old Mama in 1947.  :)
Using my beautiful Pink Depression Glass is always a favorite for Valentine's Day.  This is a candlestick topped with a beautiful plate, and a little dessert dish on top of that with a candle.  See what's keeping the glass pieces steady?  A piece of white Sticky Tac bonds the candlestick to the plate temporarily.  Love that stuff.

The vintage book art I made for our son's rehearsal dinner nearly a year ago (HERE) continues to be one of my favorite pieces on the mantel.  It's been layered with a little fabric heart sachet for the season.

Thank you for coming over to see my Valentine Mantel.  :)  Wish we could have coffee or tea and some Scottish Shortbread together.  If you want to invite me to come see your Valentine Mantel, just leave me a comment with a link below.

Blessings and Hugs,

Donna


Linked To:
Beyond the Picket Fence
My Romantic Home


Friday, January 24, 2014

Smitten, Again!

Yesterday I met my dear friend Lori half-way between her home in Florence, KY and my home in Evansville, IN for a Girls Day Out in Louisville, KY.  The weather was frigid but sunny, and alittle 'feels like -2' never stopped a girl from Flea Marketing or Lunching Out, right?
Lori found a string of Flea Markets in Louisville called Peddler Mall.  There are several locations...I see many shopping trips ahead for us!  :)  Anyway, as we strolled along through booth after booth of vintage goodies, we spied this interesting box up high.

I got it down and we oohed and aahed over how interesting it was.  Five little wooden cubbies, and a  slanted glass lid on hinges.  The little label holders in front were unique too.  

I put it back up on the shelf where we'd found it, and we went on on our way.  But within minutes, I decided that little cutie needed to come home with me.  I don't think it is vintage, but it is def. vintage-inspired.  And soooo unusual.  And soooo versatile.
I brought 'her' home with me with glee.  Vacuumed out the cobwebs inside, wiped her down, and then began the super fun work of styling her cubbies.  This little gal will surely live in different parts of my house over the years and be styled with seasonal vintage goodies that can easily be changed out.  For now she is on the old organ bench so I can prop the lid open against the wall.


She's alittle Valentine-y for the present and I am completely smitten.  Wonder what I should put in the little label placards on the front?  What would you put in her cubbies?

I'm like a kid in a candy shop at vintage flea markets...are you?!

Thanks for stopping by....Blessings, Donna


Linked to:
Tip Junkie
My Romantic Home

Monday, January 20, 2014

Little Sweet Hearts

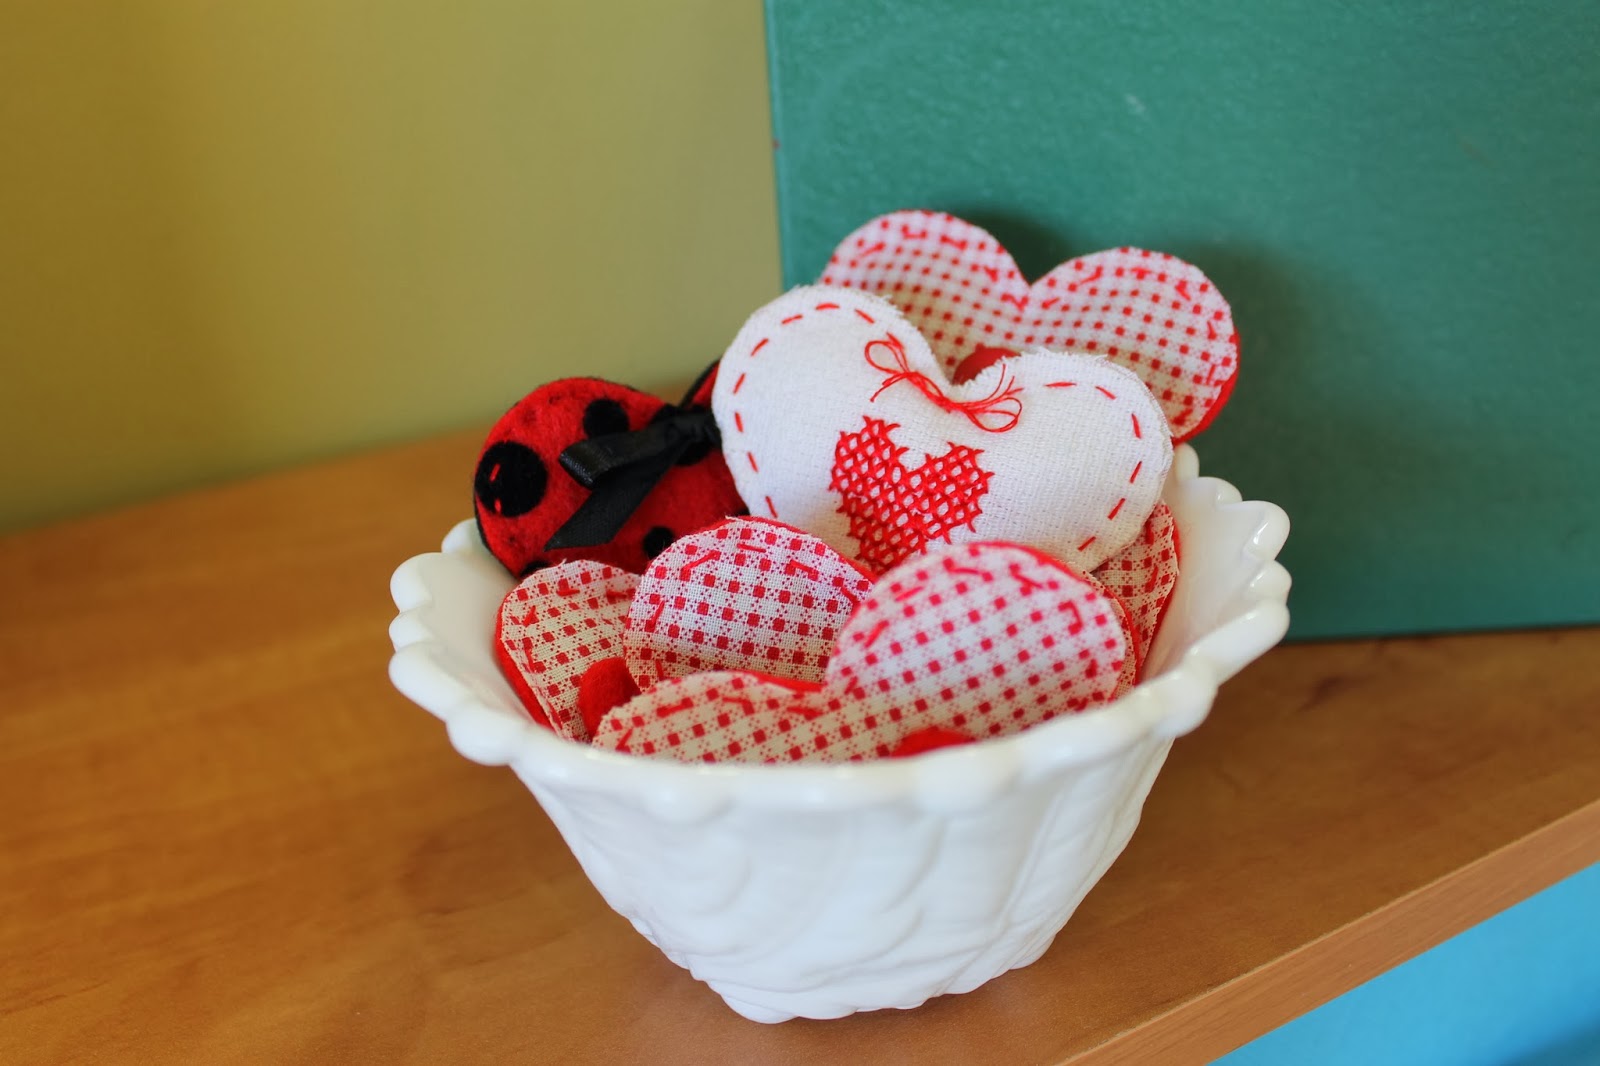
Time for a few sweet Valentine crafts!  January is a great time to start them...less pressure, which means more fun, knowing that Valentine's Day is still weeks away.  I decided to play around with some red and white fabric, embroidery floss, felt, and embellishments to make some sweet hearts that will be fun to give to friends with a card and to tuck into vignettes around the house.  So here we go...

I mostly used fabric for the fronts of the hearts, and felt for the backs.  But this polka dot felt was a must for the front of one of the hearts.  Just fold some scrap paper in half and cut out a heart about the size and shape you desire, to make a pattern.  Then cut out the fronts and backs to your hearts, using that pattern.

I used a woven fabric for the white heart, which had places for me to freehand a cross-stiched heart.  You could use aida cloth for that too.  Or even burlap!  Red felt worked great for the backs of the hearts.  Felt is so easy with which to work.  Use 2 strands of red, black, or white embroidery floss for stitching the heart fronts and backs together with a running stitch...leaving a little opening with your needle and thread still intact.
Using a small funnel stuck into the little opening, I filled each heart with some fragrant loose leaf tea.  Orange Cinnamon tea makes a great choice!  If you don't have loose tea, you can use fiberfill or dried lavender or even dry rice with a few dried herbs mixed in.  Yum!

Then finish stitching your heart together, knotting it on the back.  Give her a sniff...ahhh.  Not only cute as can be, but fragrant as well.

I embellished the front of each heart using buttons, felt hearts, stick on jewels, and ribbon.

Aren't they sweet tucked into a little white vintage berry bowl?

I am going to enjoy them in my sunny craft room for a week or two...then...
I

...give most of them as gifts.  I have one of them tucked into a shadow box too.  Cute little Valentine surprise peeking out from that unexpected place.

These are all hand cut, sewn, embellishments glued...so you can easily sit and do this in the evenings.  We are getting back in the swing of having one hour after supper most nights where we are 'unplugged' from electronics.  That one hour gave me a head start on creating these.  If you made these alittle bigger ( mine are 2 inches tall) and filled them with dry rice, they would make cute hand warmers!  Use your imagination and above all ENJOY!

Blessings,

Donna


Linked to:
Tip Junkie


Thursday, October 24, 2013

Pretty Cash Envelopes...the Dave Ramsey Way!


My husband and I have been married for 29 years.  And thankfully he had a plan for how to manage our finances when we got married.  The envelope system!  I think he learned it from the late Larry Burkett, back in the early 80s.  The man who teaches this concept world-wide today is the one and only Dave Ramsey.  It has worked GREAT for us all these years.

The gist is that you put cash in labeled envelopes for as many categories as you practically can.  The grocery money has an envelope, and when the cash is gone...you stop spending til the next payday.  I must admit we sometimes rob another envelope alittle bit if something has depleted the food cash and we need milk and apples for the next few days.  But overall, that's the way the system works.  But as you can see, the envelopes get pretty tawdry over time.


They are in and out of my purse, the car, hubby's pocket, etc.  So within a month, they start looking kind of bad.  I used to be a bit embarrassed when I'd take them out of my purse to pay for something at the store.  I wondered, years ago, if people though I was too poor to have a wallet!  Ha!  But now, nearly every time I use them at a store, the clerk says, "Do you use the envelope method?  I've been wanting to try that!"

So...this week the sewing bug hit me.  And I have lots of cute little pieces of fabric that I wanted to use to make something practical.  I have to thank the cute little gal blogger at Just Imagine Heaven who created this great tutorial for making fabric money envelopes, for use with the cash envelope system.  It was perfect for my stash of cute fabric AND perfect for fixing the grubby envelope problem.

And here are the ones I've made so far.

Strawberry fabric for the Grocery envelope.  (Ok, so when my husband goes to the grocery store for me, I imagine he'll pull out some cash and leave the strawberry envelope in the car...ha!)

This red and white gingham is sort of festive, so I am deeming it the Gifts Cash envelope.

This cute sewing themed fabric will hold my Etsy shop cash, for when I need to buy supplies.

My attempt at a 'manly' envelope for Hubby...for the Home Maintenance Cash.  Denim and red flannel...I think he'll go for that.

This cutie pie is for the Misc Cash...that's what we call the cash we use for paper products, photo processing, toiletries, cleaning supplies, a magazine, etc.  

LOVE this vintage style fabric!

Classy aqua and white prints for the Clothing envelope.  I should mention that I plan to buy iron-on laundry labels in white and create a label for the front of each envelope.  That's on tomorrow's to-do list.

And now to fill them!  One thing I LOVE about the envelope system is that it gives me permission to buy clothes for me or my guys when there is money in the envelope!  There is alot of freedom in budgeting and designating your dollars when you get paid.


The envelope system also gives you an immediate place to put receipts from those purchases.  My Etsy envelope will hang on to Post Office receipts for me til I get them filed.

Hey!  Let's go to Home Depot!  I should say that this is just for things like paint, landscaping, new door seals, etc.  We have bank accounts that would take care of big maintenance needs for our home.  When we were young and poor, we only had about $25 a month to put toward home maintenance.  But it built the habit in us, and that was invaluable.

The Gift envelope is a HUGE help.  We put a set amount in it each month, and whatever is not spent that month, stays there to be added to the next month's allotment.  When birthdays and Christmas come, we are very thankful to have this stash of cash, ready to use.

I still need to sew envelopes for Eat Out, Haircuts, Dog Care, Gasoline (a friend suggested a duct tape envelope for hubby for that!  Perfect!), and Extra.  Extra is that envelope that covers things that pop up now and then such as a new coffee pot or park district soccer fees.

Do any of you use the envelope method?  If you've always wanted to try it, you can start slow...maybe with just a Grocery, Gas, and Eat Out envelope.  Go to Dave Ramsey's website for lots of encouragement on how to Live Like No One Else So You Can Live Like No One Else!  
Blessings,

Donna

07 08 09 10
Pin It button on image hover