Wednesday, May 18, 2011

Garden Rocks

I saw a photo this morning that gave me a fun idea...when people come into my backyard gardens they often ask me what herbs I have coming up.  So I decided to make Garden Rocks to identify my herbs.  I chose 3 nicely shaped river rocks from our landscaping.

I've been saving my cute calendars over the years for some kind of craft.  Loving the drawings of Susan Branch, I used little pics from this calendar for decorating my rocks.


I used scissors and my small circle punch to cut out the little pics, then cut them down alittle further to fit the oval stones.
Here are my freshly washed and dried rocks, fitted with their calendar pics.  It would have been ideal to have had little herb pictures to go on these, but none were to be found.  Since I'm working on not being a perfectionist, I figured this was a good opportunity to just enjoy and accept what I had on hand.  :)  Time to Mod Podge...oh yes!

Satin Mod Podge and an old watercolor brush.

I applied some Mod Podge to the spot on the rock where I wanted to stick the picture.  Added the picture, then Mod Podged over the top of it, using my finger to smooth down the edges and conform the picture to the shape of the rock.

Let that initial Mod Podge dry, then added a nice coat over the entire top of the rock for a uniform shine.  Let dry about an hour.
Once dry, I took them outside and sprayed them with 6-7 light coats of polyurethane.  I also sprayed the Garden Spoon I made back in April, to weather-proof it.

Now for the fun part...place them in my garden!  I planted these herbs from seed, and have a nice stand started.  In a month, it will be lush and wonderful!  But for now, they are a bit humble.  I'm ok with that!


Thank you for visiting my herb garden today!  I always enjoy your comments and appreciate you stopping by. God bless you today with health, joy, and memories made!

 Donna 
Linked to:
          

Saturday, May 14, 2011

Quick Placemat Pillows

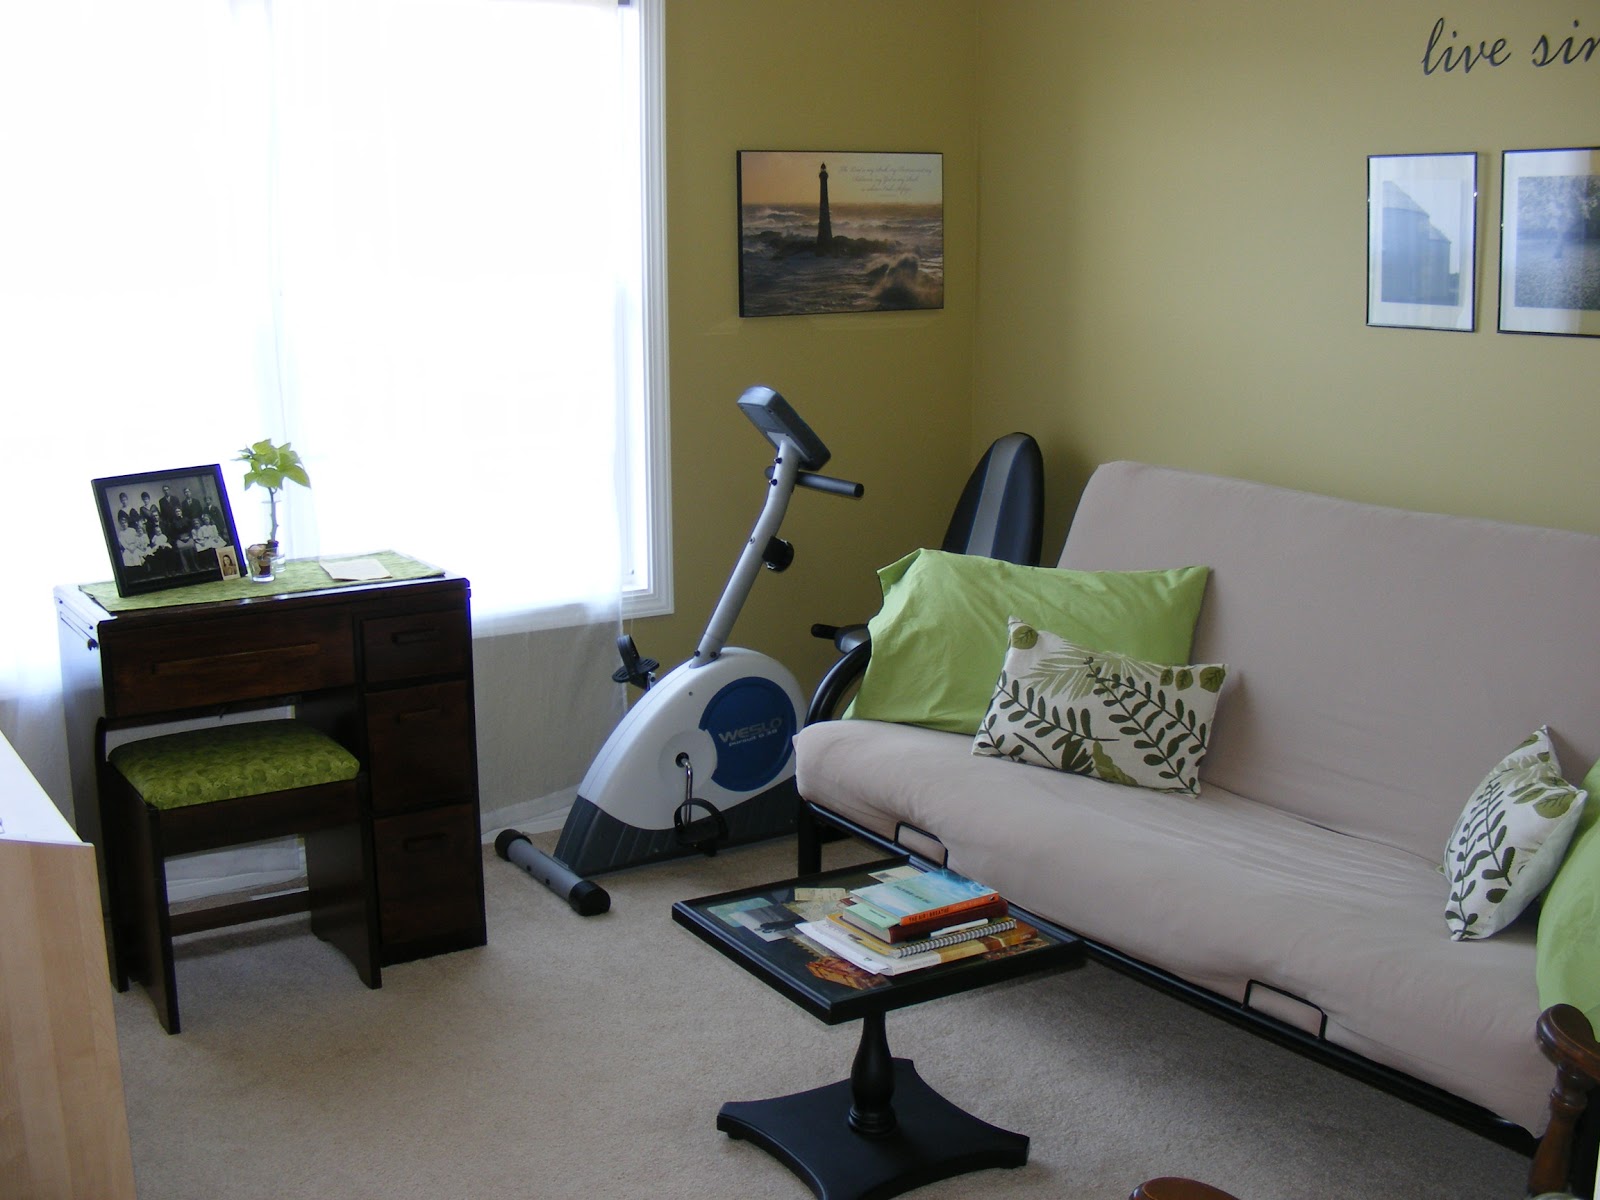
Once upon a summer, I lived in a new-to-me house.  I had a lovely, sunny, extra bedroom that we call the Den.  Truly though, I think of it as my own little room that I share with my family.  The walls are green.  My favorite.  But the room was alittle bland.  So I wanted some cute throw pillows for the futon that didn't cost much and had a neat design on them.  Thus when I found these beautiful woven placemats at Kohls on sale and found with delight that they were lined, I knew I'd found my solution!
So here's how these almost-no-sew pillows came to be.  I slit the back side lining at the bottom.  Careful to just cut through the back, not the front.  This only works with placemats that have 2 separate pieces joined together.
Next I cut an old bed pillow in half.  It's weird inside there!  Kind of like layers of polyester that have been wrapped around each other.  I took out enough of the filling so that the two separate pillows would fit in my 2 placemats.

Since it was a new-to-me house and I'd just lived there a month, I didn't have a sewing spot in the house yet.  So yes, that's me, sewing on the floor.  Don't try this at home.  Ha! I sewed the open end of each pillow half.

There she be...my new (old) pillow form.  I loved upcycling this pillow and keeping the cost down.

I stuffed the pillow form into the placemat, and since I was feeling lazy, I used an iron and some stitch witchery to close up the slit in the back.  Honestly?  It worked GREAT!  These pillows get laid on and tossed around daily and that stitch witchery has held firmly!

Here they are on the futon!  I l-o-v-e them!  The botanical print, shades of green, nubby texture, and the price...about $2.50 each.

By that fall, I had also found grass green pillow cases to further embellish the futon with more color.  I also purchased this little 1950s sewing table, refinished it, recovered the bench, and my sweet green Den is now a very peaceful place to hang out.  Ahhh.  Thanks for visiting!  I l-o-v-e comments and new followers!  Making it to 50 followers would be a dream come true!  
    Blessings!   

Friday, May 6, 2011

Individual Brownie Trifles

About a month ago, my husband and I invited our neighbors on each side of us over for dinner.  I think the Reluctant Entertainer should be proud of me!  :)  We had been at a Dave Ramsey seminar all day til 3pm.  Then home to put together a quick but nice supper and spiff up the house.  We've only lived here a year, and this is the first time that these two neighbor couples had even met!  I'm so happy it could happen at our house!

So, one of the couples enjoyed our little casual dinner party so much, that they then initiated having all of us over to their house for dinner! Tonight is the night that we are going to their house along with the other couple!

I offered to bring something, and Carrie asked me to bring dessert.  Here's a true confession...we live about 15 minutes from shopping, and with gas at $3.99 a gallon I decided to make something for which I already had the ingredients.  And that's when I decided on Individual Brownie Trifles!  Putting these ingredients all in one large trifle bowl looks STUNNING and causes ooohs and ahhhhs.  However, it doesn't scoop up very nicely and look very pretty in the serving dishes.  So I thought that putting them in parfait glasses (purchased for a song at my Goodwill a couple of years ago...love them!) would make it nice for our hostess to serve, and give everyone their own little pretty dessert.

Here's how you make them.  Bake a brownie mix for a 9x13 pan.  I like the Aldi's brand.  After they cool, cut them into 1 inch cubes.

Then stir up 2 kinds of instant pudding.  I used chocolate and the other one is cheesecake.  But vanilla would have been great too.

In the dishes, layer a cube of brownie (if it's in a parfait dish), then a ladle of the light colored pudding.  Next, place 3-4 or so more cubes of brownie, and then drench it in a ladle of the chocolate pudding.  Lastly, 'ice' the top with cool whip and...

garnish with chocolate curls or chocolate chunks.

With very little time or trouble, my desserts are on this tray now, waiting in my fridge.  How easy and fun to walk next door with these at 6pm tonight.  :)  Here's a little hint:  Trifle tastes even better when it has sat in the fridge for hours or overnight.  I have leftovers of all these ingredients, and plan to make more of these tomorrow for our Mother's Day picnic on Sunday.  Yay!

I hope you are inspired to give these a try.  Tasty.  Pretty.  Easy.  Blessings to you!!  
I am linked to skiptomylou
and Tip Junkie 
and Not Just A Housewife

Thursday, May 5, 2011

Book Review: Desiring God, Revised Edition by John Piper

I so enjoyed this book.  I've never read anything by John Piper, so this was a treat.  I had to read it slowly so that I could truly understand and think through what he said.

The basic idea that I took away from Desiring God, is that we give Him glory by enjoying Him.  Just as I feel honored and loved when my adult children enjoy me and my presence, so God is honored and loved when I enjoy Him. 

He is everything that I truly crave in life:  perfection, beauty, order, joy, love, and peace.  All of the things I long for in my earthly life and heart are found in perfection in Him alone.

I will be rereading portions of this book through the months so that I can be often reminded of where my joy truly lies.

Announcing my Very Own Little Etsy Shop!


Here she is Ladies and Gentlemen!  She is called Perfect Darlings and will feature vintage and handmade items for the home, garden, and children. Her beginnings are humble as I work at this in between home schooling and house wifing.  But I am very excited for this new outlet of creative crafting.  My shop features things that I love:  things for children to play with and wear, vintage items for the home, and FREE SHIPPING!!!  Please visit and let me know what you think.  New stock will be added shortly!  Thank you dear friends!


 Donna

http://www.etsy.com/shop/perfectdarlings

Monday, May 2, 2011

A Gift to Mail in a Card

When mailing a birthday card to a friend, I really like to include some kind of small, flat gift.  Something that will make the card more fun to open...a little surprise!

So when sending my Aunt a b-day card, I decided to fashion a magnet to send for her kitchen.  She loves sunflowers, so that was my inspiration.  I used  my Cricut to cut out flower shapes in sunflower colors, making each one alittle bigger than the one before.  I then glued them, one upon another, turning them each time so that the petals of the flower underneath would show through.  A little layered button embellishment was a fun way to make it look finished.  I cut a piece of a flat advertisement  magnet (the kind you receive in the mail from realtors, etc.) and glued it to the back. 
A sweet little 5 minute gift was born!  I loved that I could do it quickly with materials I had on hand.  That made my spontaneous idea, doable.  These could be done in beautiful colors for spring and would be lovely party favors, Mother's Day gifts for children to make, or teacher's gifts.  Enjoy!
I am linked to Skip To My Lou


Tip Junkie handmade projects


craft


Laugh Love and Craft

Sunday, May 1, 2011

Her Eye is on Me


This is our dear little dog, Gracie...part poodle and part Italian Greyhound.  She has been teaching me some life lessons lately.  I love how God takes everyday things, and teaches us about ourselves and Himself.

Gracie was a little rescue dog...she was found abandoned on the streets of Chicago by a P.A.W.S. Dog Rescue organization.  She was so neglected.  Her hair was long and so matted she couldn't turn her neck, nor could she see very well.  We found her on their internet site and went to visit her the next day.  Even after a trim and bath she looked pretty bad, until she got a real grooming!

She's now been a part of our family for nearly 4 years.  And I'm her Mama.  She's bonded herself to me, especially.

Her heart and eyes are always on me.  When I get up and leave the room, her eyes open and she watches me.  If I'm gone for more than a moment, she'll probably pick herself up from her cozy napping spot and come to be where I am.  If I leave the house, she waits by a window and watches for my return.  If I lay on the sofa, she wants to join me for a snuggle.  

And that has made me think about something...this is how I need to be with my Lord and Savior, Jesus.  My eye needs to be on Him.  My mind, on Him.  I need to be watching for where He is at work, and join Him.  I need to listen and watch for what He is doing, and follow Him.

Gracie has a little sin nature...or more accurately, she was abused in her former life.  So she is suspicious, nervous, and easily feels threatened.  Therefore, even though I would NEVER hurt her on purpose and mine are the hands that feed her, pet her, take care of her, and love her, she doesn't even completely trust me.  And if she feels threatened by a sudden movement or me trying to remove a tangle in her hair, she'll snarl at me.  Me!  The one upon whom her very well-being is dependent.  The one who rescued her from abandonment and has given her such a great home!

And so, I also sometimes snarl at my Father.  I trust God completely with my mind.  I absolutely believe and know that He is GOD and He is all-wise and loves me and my  loved ones more than anyone else does.  But in practice,  I get fearful, feel threatened, and sometimes don't act like a grace-filled child of God.  I trust Him completely with my eternity.  But with some of the storms of life, I get fearful.  Like my dog.

As I notice Gracie's devotion to me and to being in my presence, I am going to remind myself to long for God's presence in my hour-by-hour day.  To stay close to Him.  To talk to Him all throughout the day.  And listen to Him through His Spirit and the Bible.  Obeying what He wants me to do and focus on each day.

And when I get frustrated that Gracie sometimes doesn't trust me completely and  doesn't yield to my ministrations, even though I have ONLY her best in mind, I shall remember that I need to trust my Father and what He allows.  Completely.

07 08 09 10
Pin It button on image hover